Work Order Templates allow users to pre-select different aspects of the work order to simplify and automate the work order creation process. This brings a new view to the Administration > Service Capabilities section.
Filtering of Service Capabilities
The Service Capabilities screen has a new interface. Above the table of capabilities there are a list of filters:

1. Visibility (All, Public, Employees Only, Invisible) which filters service levels by the visibility setting set in the Identification tab of the x service level(s) section
 2. Capability filters by a specific service type, which was chosen when the capability was initially created
3. Product Type filters capabilities by associated product type set from the Assets & Product Types section in the left panel of the service capability template

4. Company Site can be used to filter by the service capabilities that are linked to certain sites from the Applicability tab

5. Applicability drop downs have the lists of options for master and service applicability that target the template checkboxes "Selectable as MASTER", "Selectable as SERVICE" and "Apply Service As Master template".
- Master N/A = NOT Selectable as MASTER
- Master Template = Selectable as MASTER
- Service N/A = NOT Selectable as SERVICE
- Service Template = Selectable as SERVICE
- Service + Master = Selectable as SERVICE and Applied as MASTER


Order-Level Tasks & Requests


Report Definitions
Reports are now turned on via the Report Definitions tab. They can be turned on for all or just certain service levels at the order and asset level.

Parts & Charges
Parts and Charges can now be pre-selected in the new work order template configuration. To add any parts or charges to a template, click into the 'Parts & Charges' screen for your selected service capability.


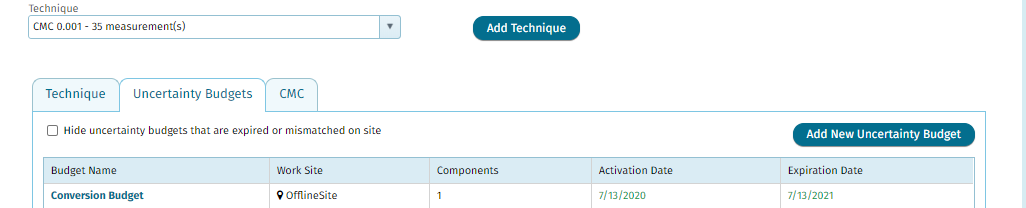
Technique & Uncertainty

The drop down list of techniques lists the techniques assigned to some measurements in the current template on top and indicate how many measurements are assigned:


Measurement Forms
Measurement parameters are created within the Measurement Forms section of a capability. There are now expanded features in addition to the ones outlined here: Service Levels.
 In the Form tab, the actual parameters can be added/edited. In the Measurements tab, the measured value name can now be titled so on the as found/left screens of a work item, this name shows instead of Expected Value:
 The Conversion/Rounding tab allows rounding rules to be set for a variety of stagnant or calculated values.
Side note: The other tabs not mentioned in this article are the same as explained in the Service Levels article linked above.

Within the Measurement Forms section, click on the Conversion & Rounding Formulas tab to set the rounding rules:

An expression for the rule can be set using the same expression types found in the uncertainty budgets: Uncertainty Budget Expression Types Explained. In the example below, if this rule were set to be the nominal/expected value in the Conversion/Rounding tab of the parameter, the nominal would become the air buoyancy + 1.

Various rounding types can also be set:

- No Rounding - apply no rounding to the conversion result
- Decimal Places - sets specific number of decimal places specified in the Rounding Parameter, padding with trailing zeroes if necessary
- Significant Figures - rounds to specified number of significant figures specified in the Rounding Parameter
- Nearest Unit - rounds to the nearest unit specified in the Rounding Parameter (e.g. nearest 0.5 will produce values like 0.5, 1, 1.5, 2, 2.5 etc); note: do not use rounding method if this one is chosen. An example of the nearest unit set up is here:
value 7.35 (nearest unit 0.5) -> round(7.35/0.5) * 0.5 = 7.5
value 55 (nearest unit 20) -> round(55/20) * 20 = 60 - Standard Deviation Precision - rounds to the first significant digit of the standard deviation (for multiple readings only). Rounding Parameter should not be used. This option can only be applied to the Mean calculation in the Conversion/Rounding tab of the measurement parameter.
- Asset Attribute Significand - number of decimal places set is taken from the number of decimal places in the value of the asset attribute specified by the Rounding Parameter

- Tool Attribute Significand - number of decimal places is taken from the number of decimal places in the the value of the tool attribute specified by Rounding Parameter

- Tool Resolution - works the same way as the Nearest Unit, but the unit is taken from the current tool's range Resolution parameter. More about tool range is here: Tool Range. The value is then padded with 0s to have the same number of decimal places set. For example, if tool resolution is 0.25 and the value read is 2.001, it is first rounded to 2 (nearest 0.25) and then padded to 2.00.
- Asset Resolution - works the same way as the Nearest Unit, but the unit is taken from the current Unit Under Test Resolution attribute.
For more information about Sevice Capabilities go here.