Overview


The Service Levels page allows you to create all the distinct services your company provides with the ability to elaborate and define all the options and tasks relevant both to your service team and/or your customers.  Service Levels can be defined for services performed internally on your company assets, and/or can be configured for your customers to select from when requesting service from your company. Service Levels are based on the selections created in the Service Capabilities tab.


Workflow


To view and edit Service Levels click the "Service Capabilities" tab in the ADMINISTRATION module: 


Configuring Services

Applicability and Submission

Template applicability and submission tab defines the work order submission rules for a template.

Identification
Identification contains basic information about the template and visibility drop down with options of Visible, Employees Only and Invisible. New template should be created as Invisible in order to avoid selection of the semi-configured template by the users. Once the template is configured, it should be made visible explicitly.


Direct Link
The direct link allows users to create a company link for starting a work order on a specific template.


Applicability
Applicability tab defines when this particular template is selectable.


Selectable as SERVICE TEMPLATE 
option allows the template to appear in the service level selection for individual work items. This relates to everything under the "Service Configuration" section in the left panel.

Selectable as MASTER TEMPLATE option allows the template to be selected from a list of templates in the work order (for vendors only). This list is available under the Service Site and only when the applicable Site is selected (i.e. the list of templates is filtered by site). This also relates to everything under the "Process Configuration" section in the left panel.


Apply as Master Template option applies (adds) all order-level options (Tasks & Requests, Report Definitions, Parts & Charges) to the order.

Target / Customer 
Target/Customer filters specifies whether the template is selectable for a client order, internal order, or when submitting a request to vendor.

Submission Rules

All options in Submission Rules manage the location options (Logistics Tab of the work order) and confirmation screens when submitting an order


Applicable Product Types: Click Add Product Type to choose the types of categories the capability can be selected for. Click the checkbox to the left of the needed categories. Note: these are the categories that assets can be tied to via the product selected. Hint: if all Centrifuges can use the capability instead of a specific type of centrifuge, for example, click the checkbox to the left of just the parent category instead of each child category. Double Hint: If any category can be tied to the capability, don't select any product type. Click Select when complete. 


Product Type filters capabilities by associated product type set from the Assets & Product Types section in the left panel of the service capability template


Automatic Direct Communications

Click Communications

The Attachments options mirror the report types available in the Report Definitions. Selecting an attachment type will automatically attach any generated reports from the work order that match the report type selected. The Attachment options include the following:

  • General
  • Asset Summary
  • Asset Label
  • Asset Detail
  • Asset Certificate
  • Order Summary
  • Order Invoice
  • Order Estimate
  • Order Detail
  • Order Certificate

The Recipients option will automatically add certain contacts to the email being sent. The Recipient options are as follows:

  • Order Owner – the email listed for the owner of the order

  • Logistics Contact – the email listed on the Logistics tab on the order

  • Billing Contact – the email listed on the Billing tab of the order

  • Client Site Contact – the email address listed in the site shipping for a customer site

  • Client Company Contact – the email address listed in the primary contact of the client

  • Client Account Representative – the email associated with the account representative assigned to a client


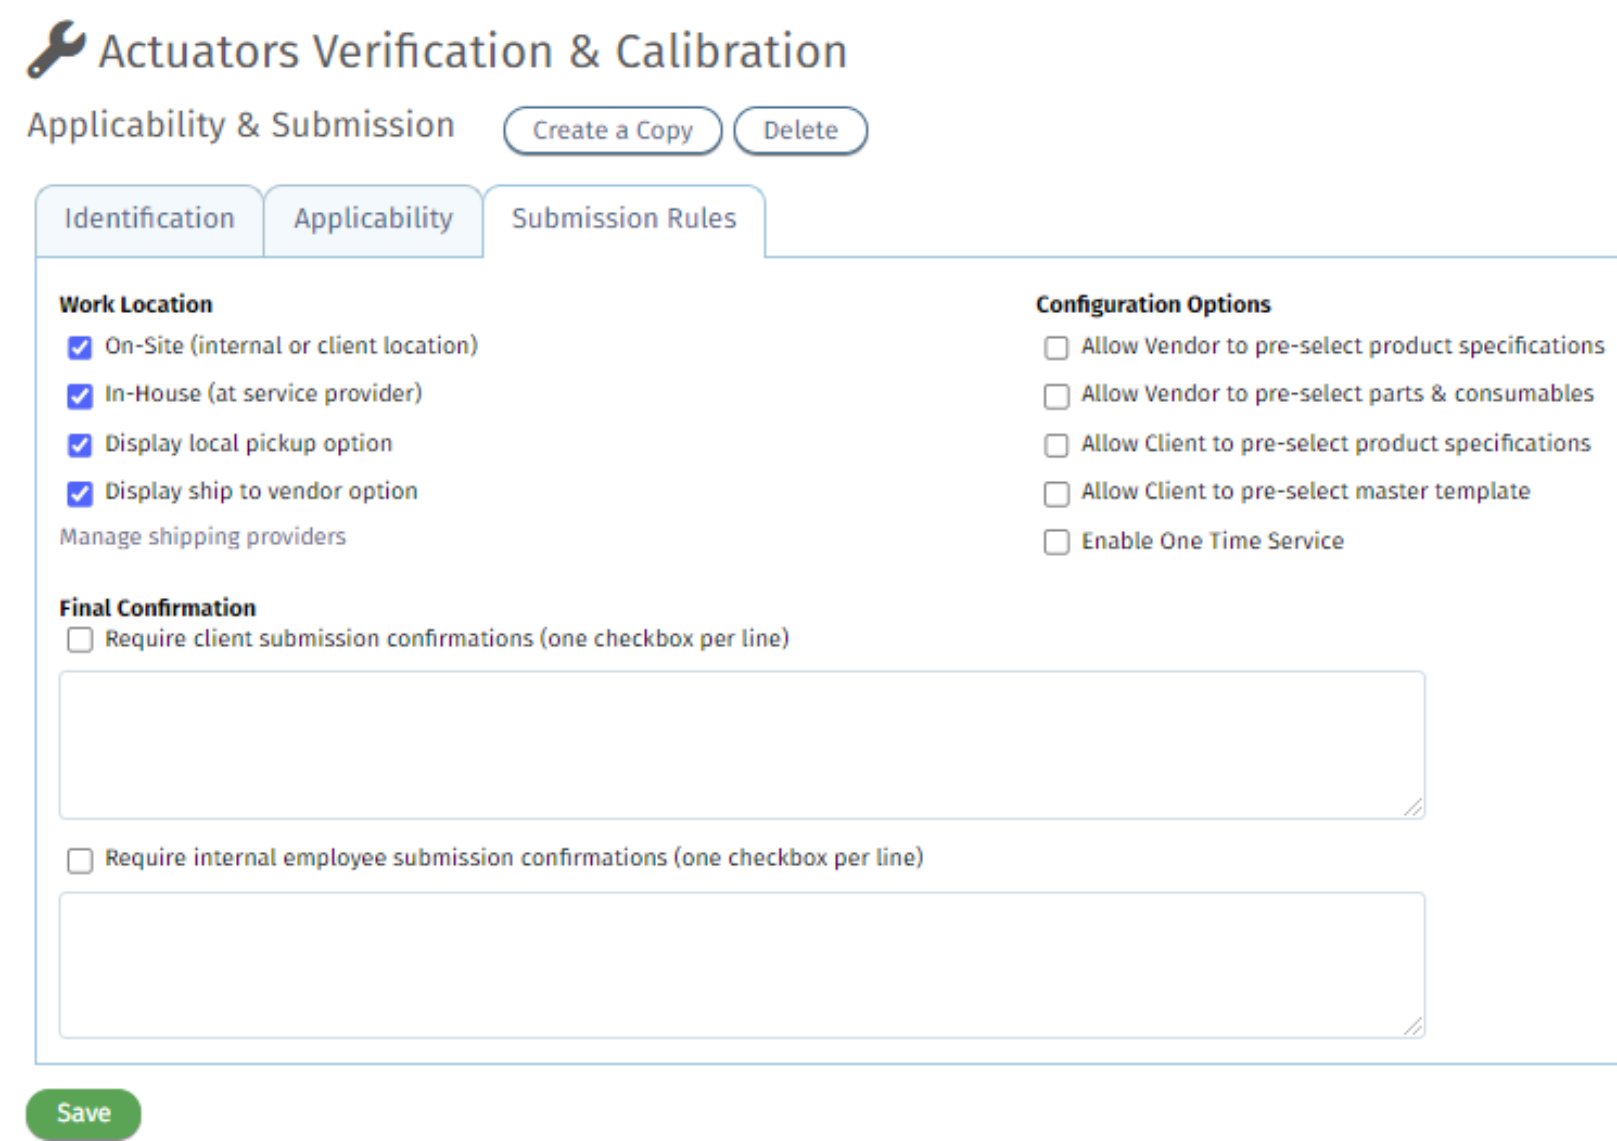
Service Levels and Options


The second client-facing tab is the "Service Levels & Options" tab, which allows administrators to define capabilities in detail.

Service Options create rows, and Service Levels create columns: 


Add Service Level

"Add Service Level" allows admins to specify Instrument Category or service sub-categories for added client clarification. For example, this is where you would differentiate between Non-Refrigerated vs. Refrigerated or Calibration Standard vs. Calibration Plus, etc. The service level title should display what you would like your clients to see when selecting a services. 


IMPORTANT: The document number entered here should reflect the SOP used for this type of service. If you have also added these documents to your Document Manager, use the same reference number so that technicians will be able to refer to those documents quickly. 


Through the Skills tab, certain employees can be authorized as ones who can service assets linked to this level. The number of employees that must be working on the item can also be assigned. To learn more, go here: Skill Groups


Add Service Option

Service Options should be used to delineate the differences between each service level. To add an option to this list, click "Add Service Option." Name the option and select whether or not this option varies in price based on the instrument category (for example, you may charge more for speed calibration of an Ultra-Centrifuge than you do for a Bench-top Centrifuge). Note: Make sure you have the 'Measurements' tab filled out to unlock 'Associated Parameters' option. Scroll down to see step by step guide for Measurements. 


Not all of the options added will be included for each of your different service levels. To customize the table based on your unique services, click on the word "Included", which will be the default for all options when initially added, and select a different option. This is also where document numbers and skills can be set per option instead of per service level (meaning it would apply to all options). 


Add Parameters to 'Service Options'

To configure an optional value that is associated to specific measurement data you are able to associate parameters that will be enabled only when the option is selected. The measurements must first be set up, which is explained below. To add a parameter, click on the title of the Service Option:


In the Associated Parameters section, click "+Add Parameter" 

Use the drop-down menu to select from a list of all the Measurement Types configured in your Measurements Tab, select the appropriate parameter and the number of measurement points, additional points, or readings for that parameter and press "Add".


Press "OK" once all of the parameters have been correctly added. Also note that parameters tied to optional services should be left blank, or "N/A" in the Service Preferences tab. These options will only be enabled in the fulfillment screen when selected in the order. 


Tasks & Checklists

The Tasks & Checklist are used to outline procedures / steps that technicians must complete for assets with this selected Service Level. This tab may be particularly useful for Preventative Maintenance Services by giving administrators the ability to define requirements for technicians to indicate "As Found" and "As Left" status of each task as they go. Each "Task" added here will create a "Checklist" in the fulfillment interface based on what is Included or Skipped for the selected Service Level.


In the Tasks & Checklists table, Tasks create rows and Service Levels create columns. Note that any service levels created in the previous "Service Levels & Options" tab will be displayed here, and vice versa. The Tasks defined here add to the Options defined in the previous tab. You do not need to duplicate service levels. You may also choose to skip tasks and checklists all together.  To create a pass/fail toggle in the Checklist when servicing an item, check the box under each level. To learn more about task options, go here: Tasks.


Technique & Uncertainty


The Technique section allows users to define various techniques for the company and associated uncertainty budgets and certification CMC scope values in one screen.

This screen is not specific to the current template, it displays company-wide techniques. Specific techniques can be selected under each measurement parameter.


The drop down list of techniques lists the techniques assigned to some measurements in the current template on top and indicate how many measurements are assigned:


These techniques will show in the Measurement Parameter:

Uncertainty Budgets


Budgets can be created through the techniques section. Budgets that are expired have an expiration date highlighted in red. Budgets that are linked to a site that are not assigned to this template have the site name in red. Both can be filtered out by the "Hide..." checkbox. Steps to create budgets and CMCs have not changed and can be found here: CMCs and Uncertainty Budgets

Measurements 

The measurement tab allows administrators to advise service technicians on which measurements they can make given a specific instrument category and service capability.


Clicking the "Add" button at the bottom of the page brings up a window allowing admins to adjust measurement parameters via the popup below. Note: the Measurement Name should match the Parameter name in the specification test point:


Editing Measurement Parameters

In the Measurement Points tab, you will be able to select the options for adjusting the number of measurement points and add additional measurement points per service level.  You can also select the measurement's quantity and unit, give the measurement a standard number of Measurement Points, add a Technique (set up in the Registration section of Basic Information in Administration; used for uncertainty budgets), and give the measurement points names that should default. The names will override the test point names set up in the specification used.


In the Readings/Standards tab, you'll be able to select the ability to edit the number of readings, channels, and displayed or expected value per service level.  You can also give the measurement a standard number of readings, set number of channels, reading logic, and how many tools can be used.

Advanced Reading Entry Logic gives the ability to have dual entry readings with mathematical operators. Select 'Two Values' or 'Two Values and Result' to enable the dual entry option. Next select the mathematical operator from the drop down list.

The formulas for each option are as follows:  
Multiplication = a * b
 Division = a / b
 Addition = a + b
 Subtraction  = a - b
 Reverse Subtraction  = b - a
 Difference = Math.Abs(a - b)
 Minimum = Math.Min(a, b)
 Maximum = Math.Max(a, b)
 Average = (a + b) / 2


The settings in the work order appear like below:


In the Display/Acceptance tab, you will be able to set what measurement readings will be displayed in your service order as well as set any Pass/Fail Criteria and Uncertainties/Guard banding.


In the Environment Variables tab, you will be able to set which environmental conditions need to be recorded during service.


Click "OK" after completing the previous steps, and the Custom Fields tab will become active.  In the Custom Fields tab, you will be able to enter text that will become part of the form description, select for this information to be displayed in the Pass/Fail Selector, and add a new field by clicking "Add new field" where you will be able to create custom areas on your service level for additional information that may need to be recorded, i.e. unit conversions or extra client or vendor tools used. Also, you can link attributes. 

Once a custom field is linked to an attribute, the value of the attribute will be shown as the default value when the custom field is shown in a work order. When the work order is completed, the linked asset attribute will be updated with the value that was supplied during the work order. 


This functionality will allow asset owners to better expose their asset attributes to their vendors and have vendor data from a work order  update the assets attributes. 


Service Preferences

The "Service Preferences" tab allows system admins to specify the number of measurements that technicians must make for particular services. The "Measurement", "Parameter" and Service Level columns on this tab are generated from the information configured on the previous tabs: "Service Levels & Options" and "Measurements"


Click on the measurement that you would like to add for each service level and indicate the number of points or readings that you require for the service level.  NOTE: If you have optional points, please leave the measurement as "N/A" and see the section above about configuring parameters to optional services.


Note that the number of measurements will primarily vary based on whether the measurement is an "As Found" or an "As Left" point/reading.


Report Definitions

Reports should be configured based on the type of report and the individual service levels. All report templates that are added to your portal will be available throughout all
Qualer provides the following standard reports: of your configured service levels.  All reports that you would like to generate at the order level or asset level must be enabled in this screen. You must have at least one Service Level column in order to enable to or disable reports.  


  • Order Invoice (Order Level)
  • Order Estimate (Order Level)
  • Work Summary Report (Order Level)
  • Preventative Maintenance Report (Asset Level)
  • Calibration Report (Asset Level)
    • Unaccredited 
    • Accredited 

Qualer standard reports are updated with version releases.  However, if you would like additional or customized reports, please contact the Qualer support team at (858) 223-1560. You are also welcome to use Microsoft SQL to generate proprietary report templates and upload .rdl files directly to your portal.  


To add a report, you must first select the level (Order, Asset, Event) that you would the report to be defined.


Name your report, select the export format and upload the correct report template file:


In the "Variables" tab you are able to add header, footer, or introduction text that is specific to your company. Note: these work when the report is coded to pull this information.


Use the Print Setup to customize label settings:


Use Automation to set up Report Generation:


Once you press "Update" you will be able to select or unselect a report for each different service level by clicking on the adjacent check boxes.


Service Comments
You can add preassigned service comments to streamline your workflow in the Service Comments tab. These will be selectable in the Checklist section of an item's fulfillment:


To add a service comment you will type it within the text bar on the left and select "Add Service Comment." 


The comment will now appear in the Service Comment table.  To remove it from your service level click the red x to the left of it.